Prosox Proxy Settings
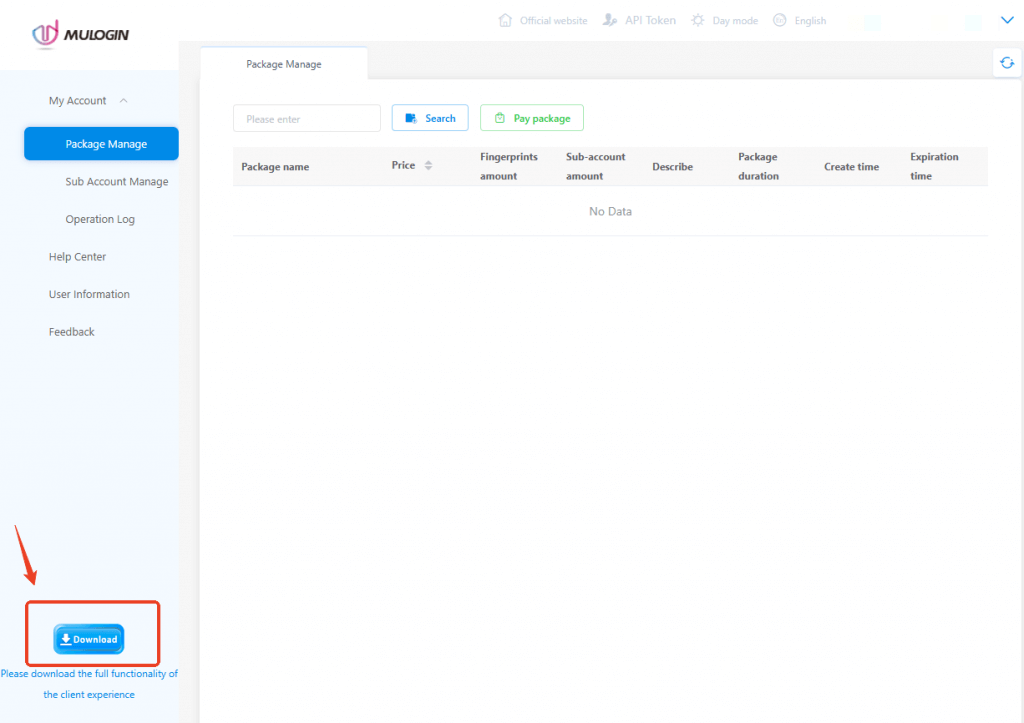
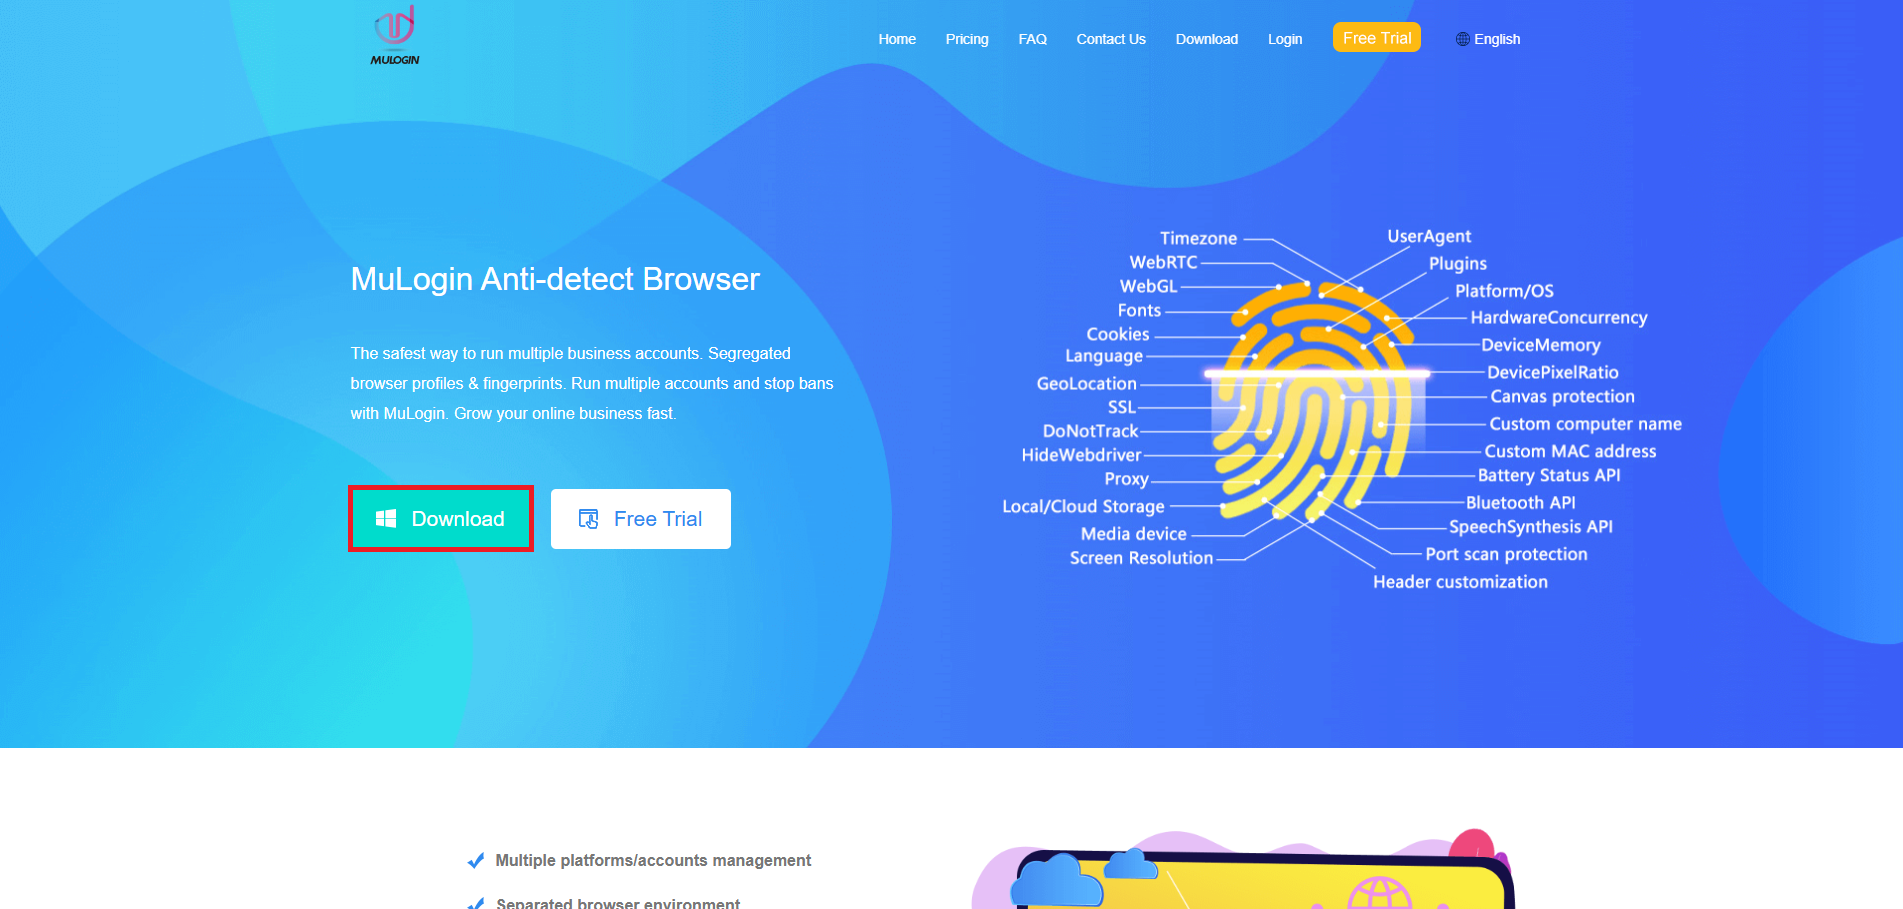
Download and install MuLogin
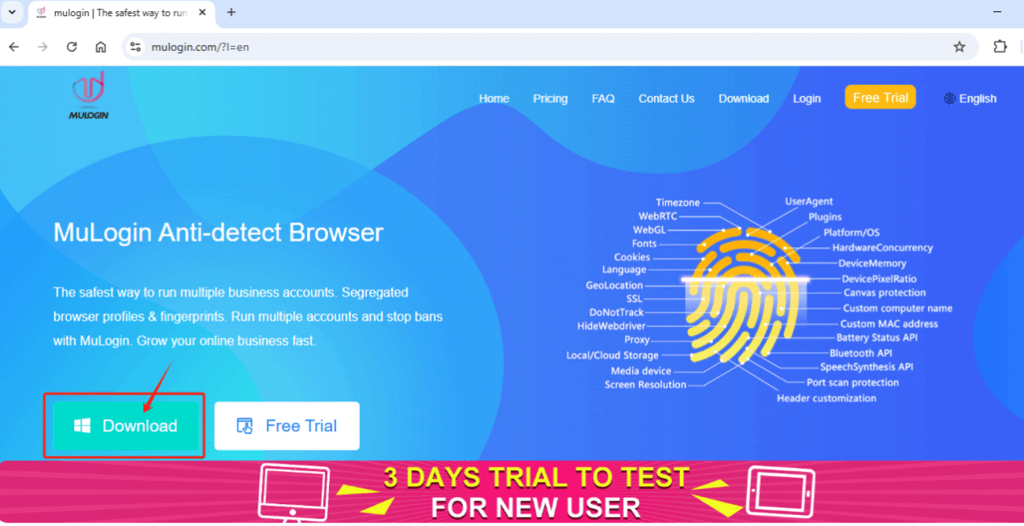
- Open the official MuLogin website in your browser.
- Download and Install MuLogin.

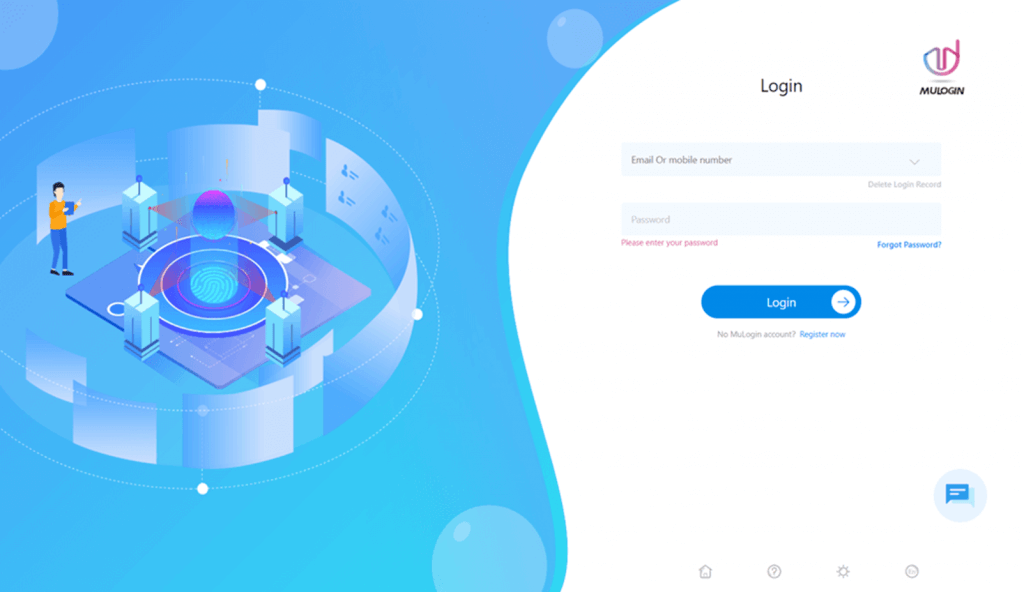
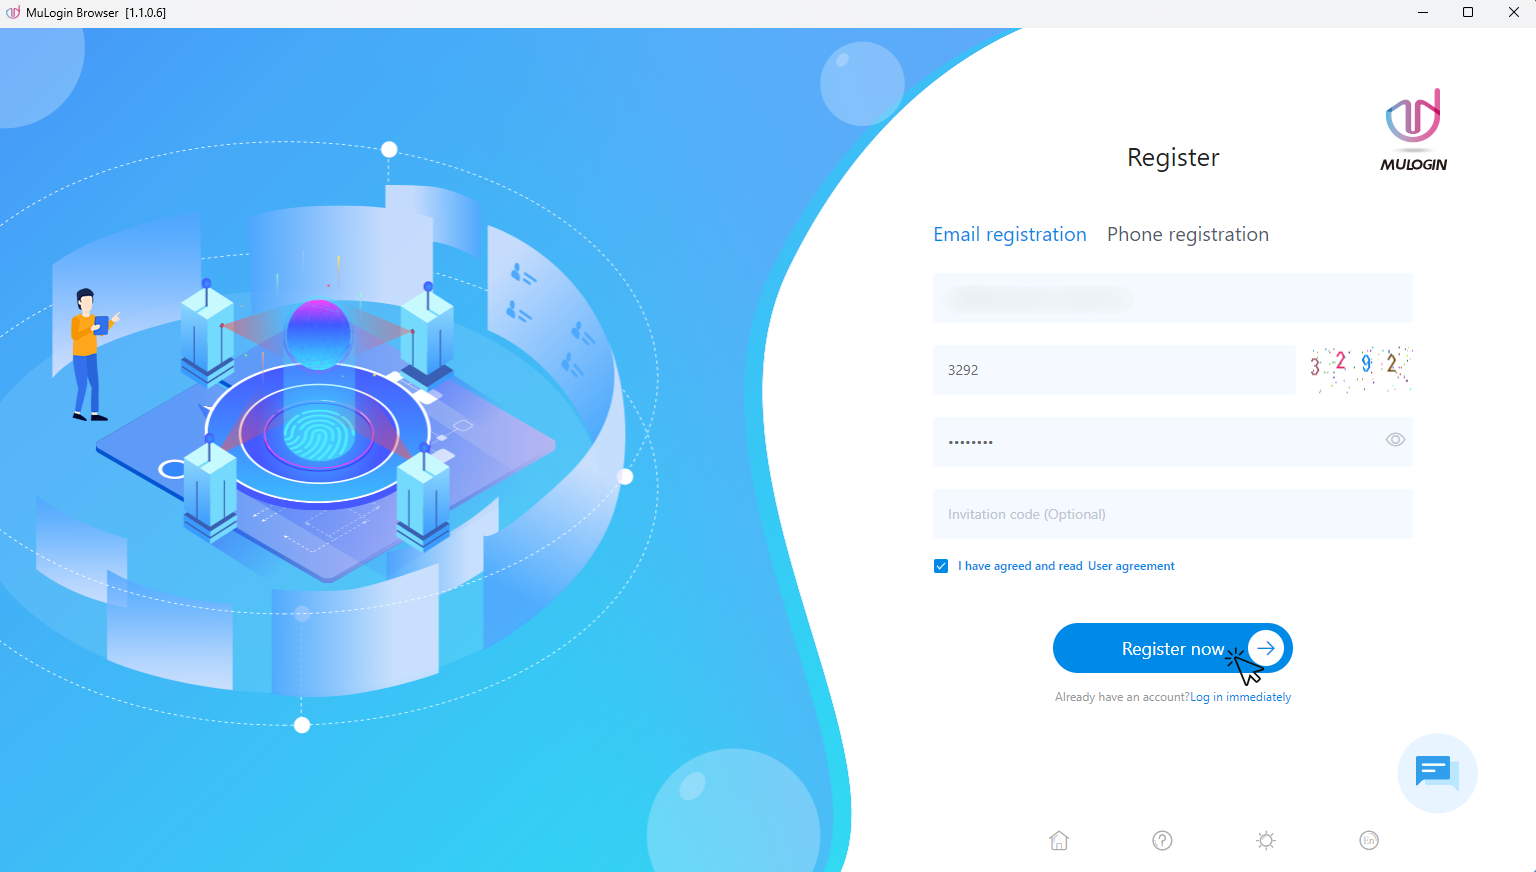
Register an account with MuLogin
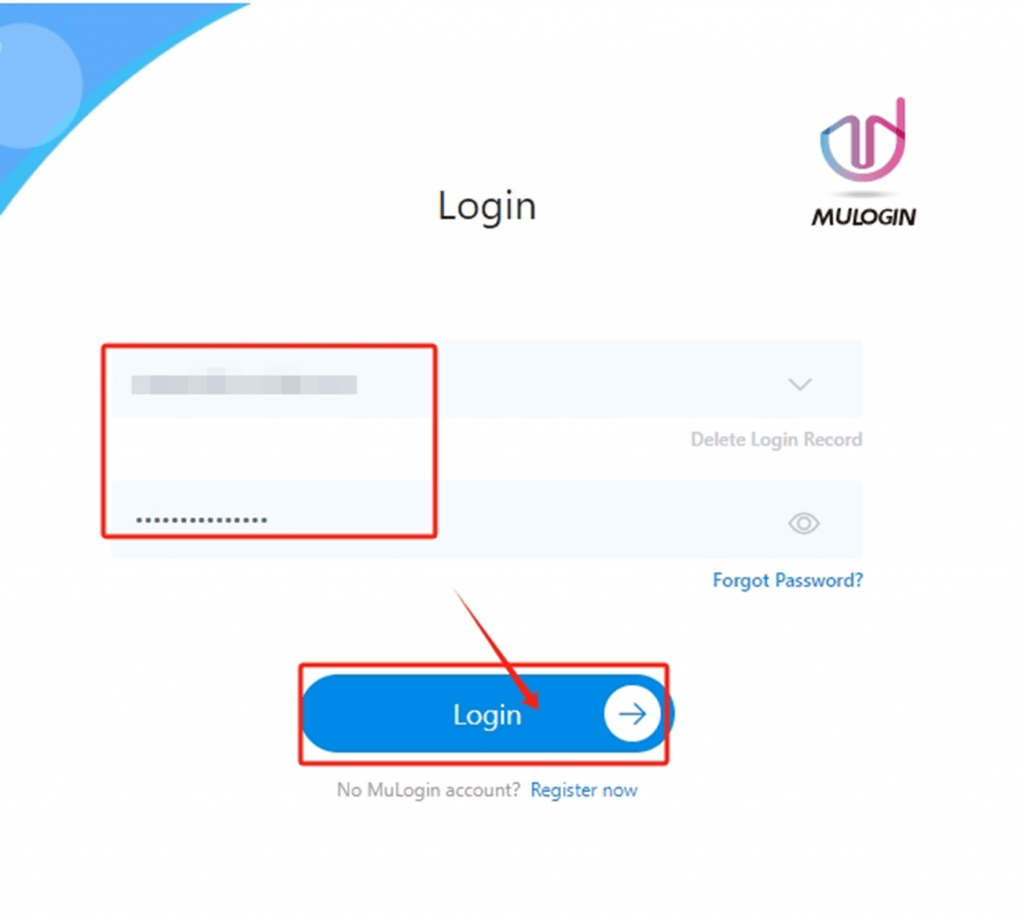
- Click Sign In/Register in the login window.

- If you already have an account, enter your email and password.
- If you don’t have an account, register via email, fill in all the fields, and confirm your email address.
You can also register using third-party service accounts if this option is available in the current version. - Return to the application and log in with your login and password.
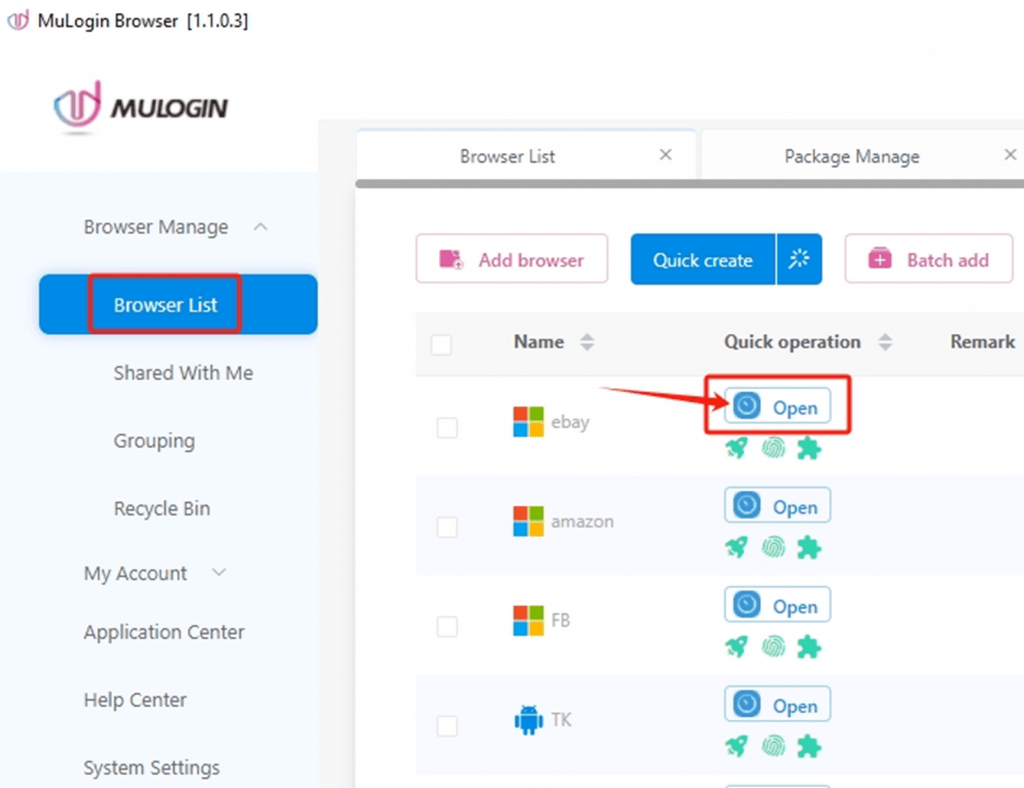
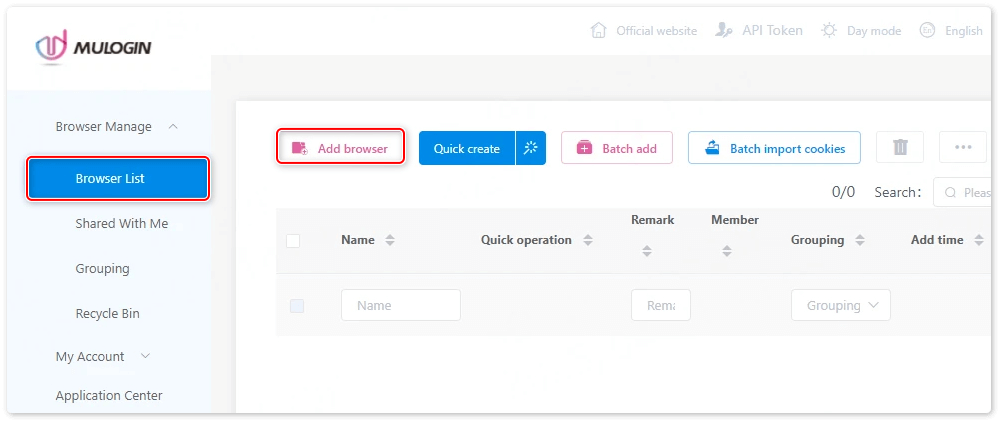
Creating your first profile in MuLogin
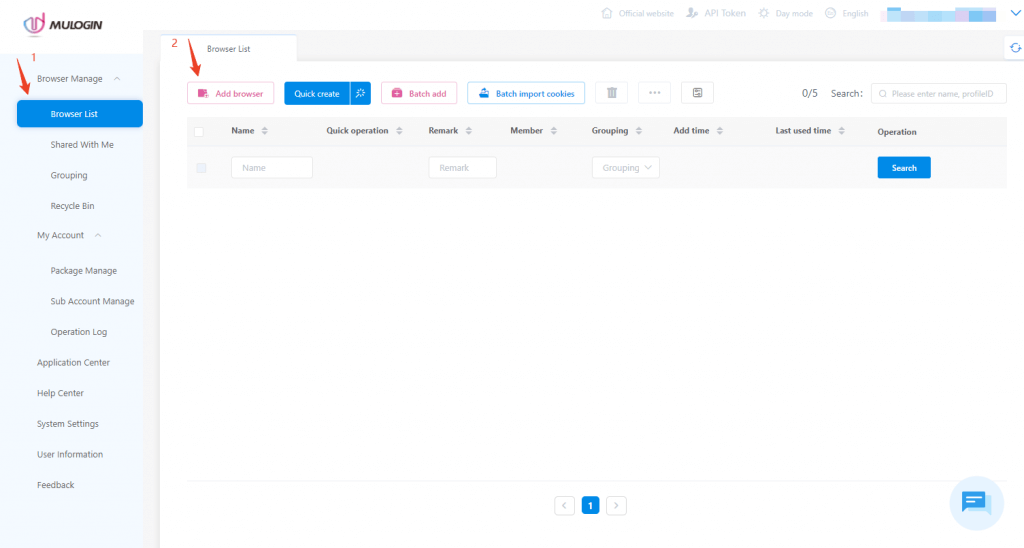
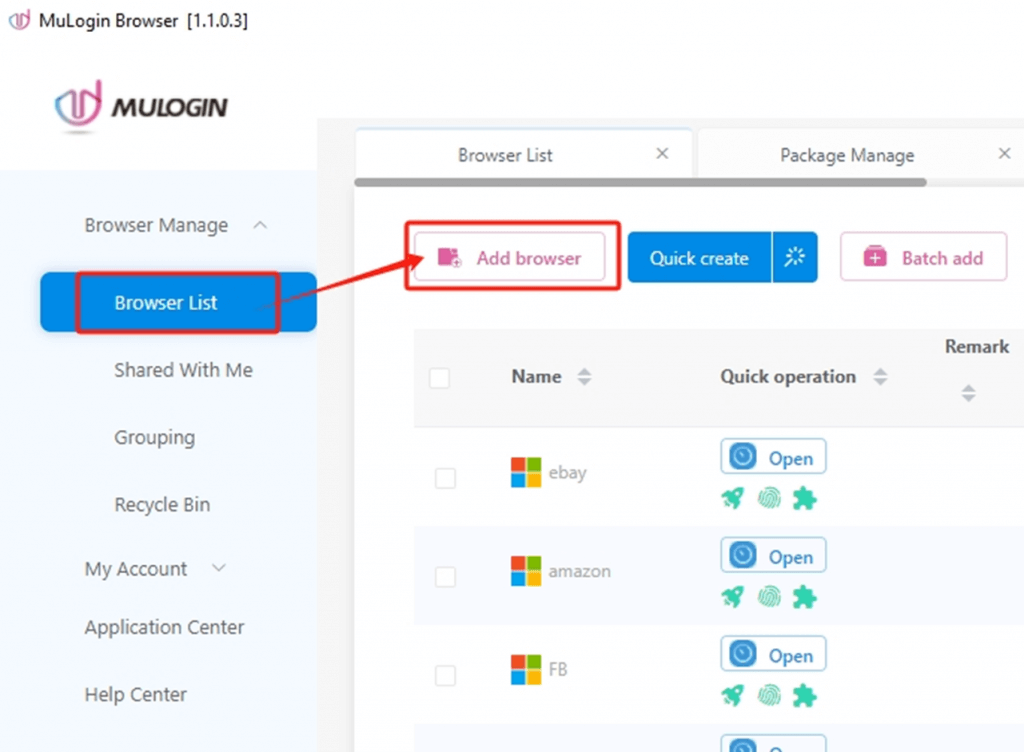
- In MuLogin, open the Browser Profile section.
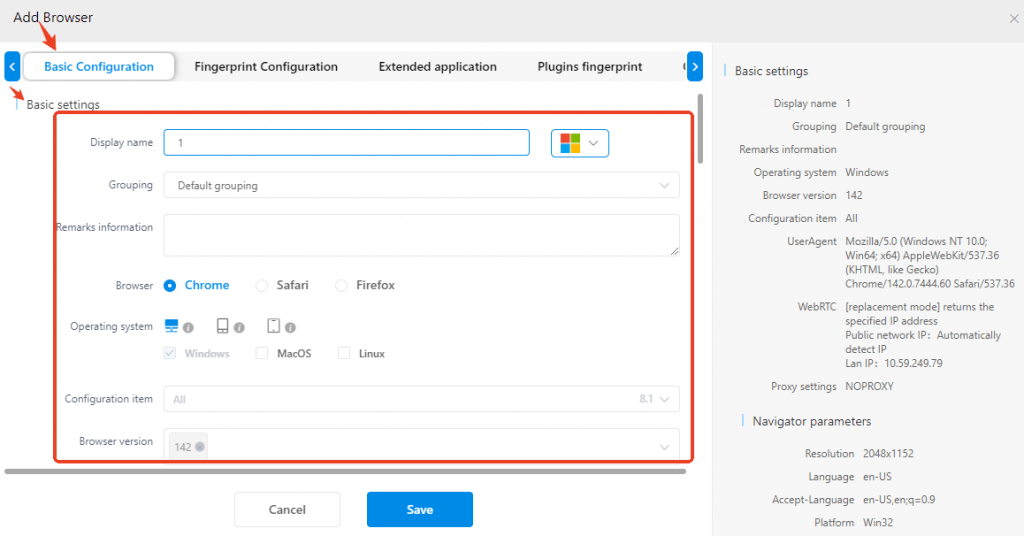
- To create a new profile, click “Add browser.”

- Enter a profile name (for example, Prosox test).
- Select the browser engine/core: Chrome or Firefox (leave it as default if you are not sure).
- OS: specify the environment — macOS or Windows.
- User-Agent: leave auto-selection in Mulogin for optimal masking.

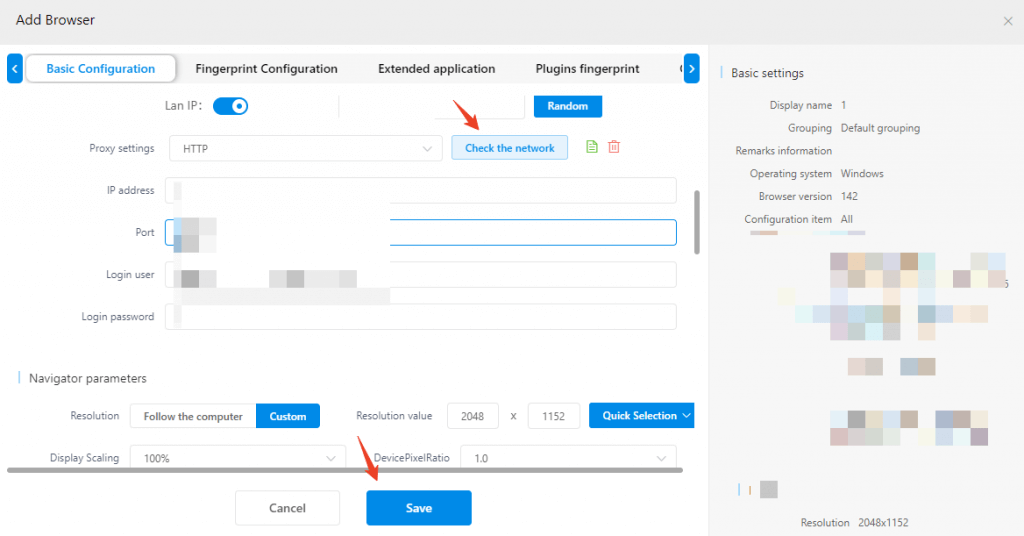
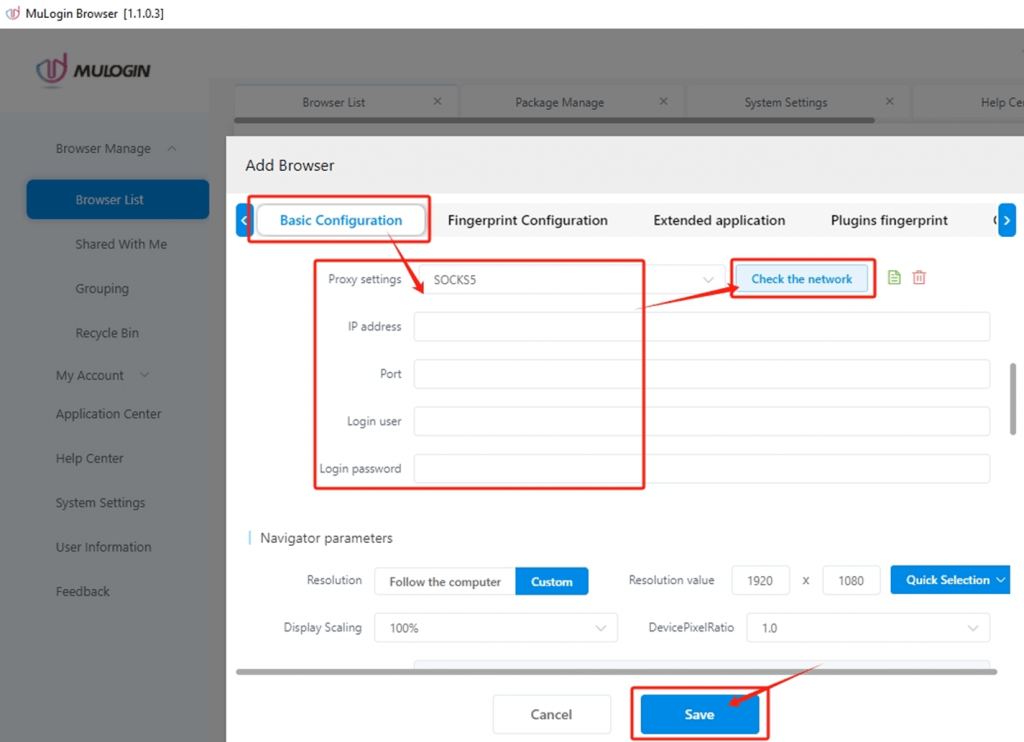
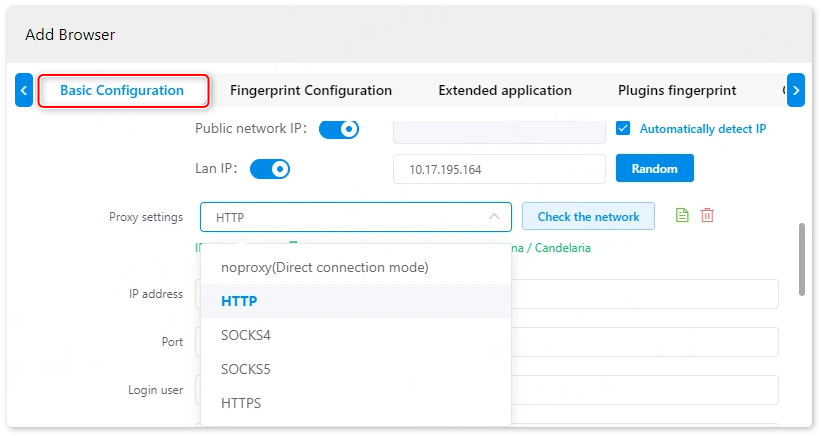
- Go to the Proxy section (or the “Proxy Settings” tab).
Important: each profile = one proxy. This is safer.
Preparing proxy data in Prosox
- Log in to your Prosox account. If you don’t have it yet, create one by confirming your email.

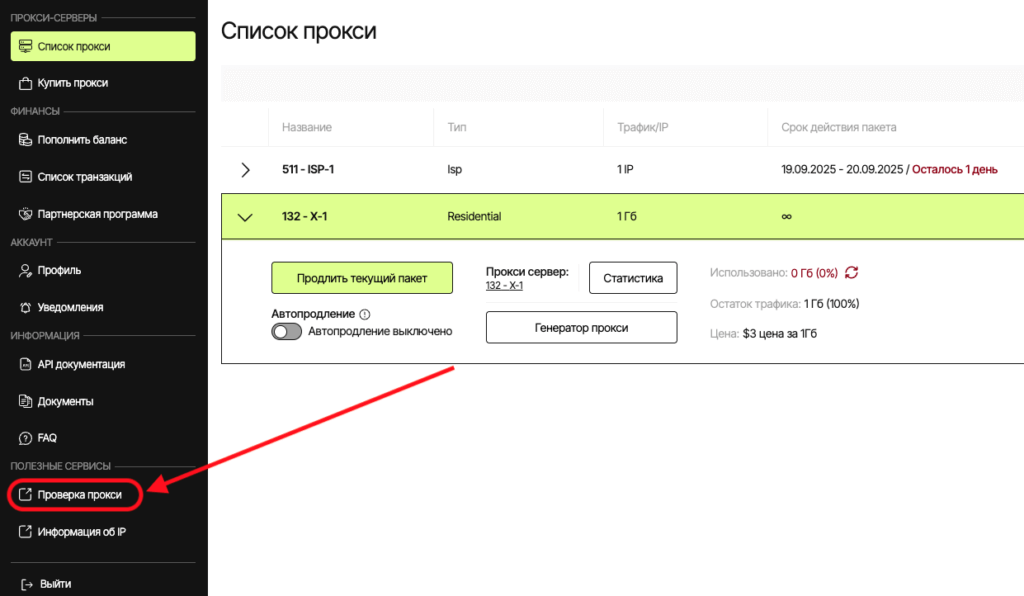
- Go to the “Proxy List” page if you already have proxies, or buy proxies if you haven’t done so yet.

- Select plan/proxy type:
- Residential (rotational) – for “picky” sites, parsing, advertising. IPs can change.

- ISP (static) – the same stable IP for long sessions, accounts, payments.

4. Copy the connection parameters.
Connecting Prosox RESIDENTIAL Proxies
Example: You purchased unlimited residential proxy servers from Prosox.io and received the following:
0Wva7syVx7Qh:sikjfc9v@84.55.4.64:5432
- Fill in the fields:
- In the proxy type field, select HTTPS or SOCKS5 (whichever is specified in your Prosox).
- Host: enter your HOST from Prosox (example: 84.55.4.64)
- Port: 5432
- Login: 0Wva7syVx7Qh
- Password: sikjfc9v
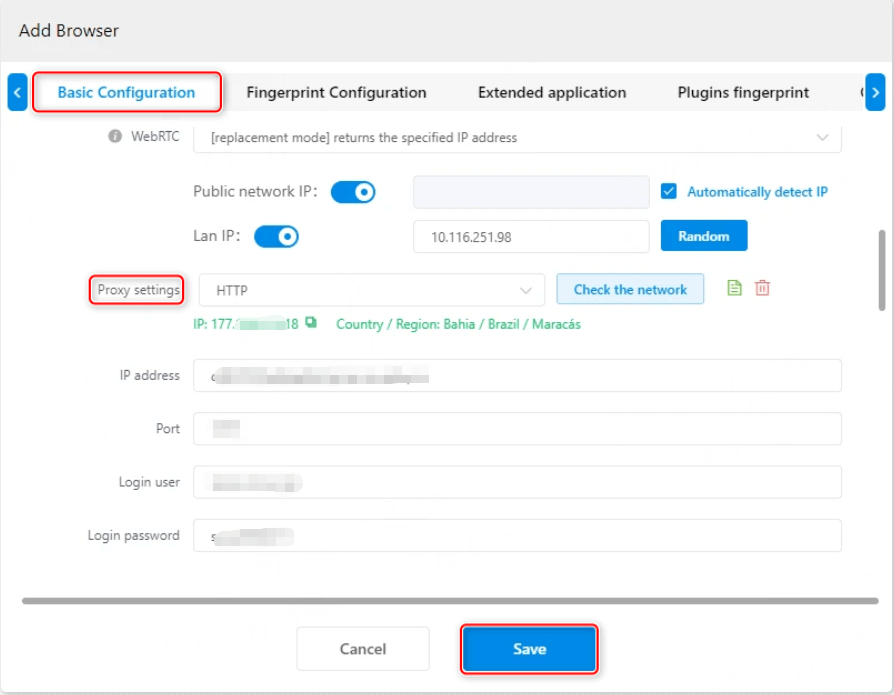
- Proxy check.
- Click check proxy.

- Green status — everything is ok, let’s move on.
- Red — double-check the data.

Proxy server verification is already implemented in the Prosox.io personal account. You can check the correct operation from your personal account.
Connecting Prosox ISP (STATIC) Proxies
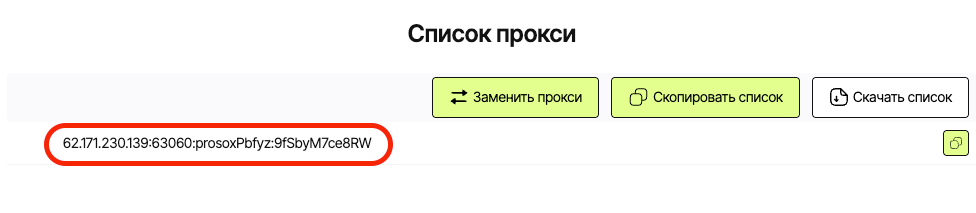
Example: You purchased USA proxy servers from Prosox.io and received the following:
62.171.230.139:63060:prosoxPbfyz:9fSbyM7ce8RW
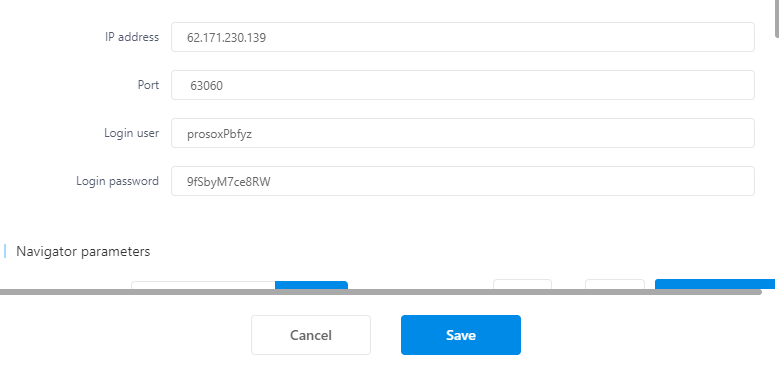
- In the proxy type field, select HTTPS or SOCKS5 (whichever is specified in your Prosox).
- Host: paste your HOST from Prosox (62.171.230.139)
- Port: 63060
- Login: prosoxPbfyz
- Password: 9fSbyM7ce8RW
- Click Check proxy.
- Click Save Profile.
Why ISP proxy: you get the same IP every time you run. This is ideal for long sessions: accounts, billing, payments, careful account management without IP “chatter”.
Setting up “Fingerprints” (to Reduce Blockages)
Make the profile as similar as possible to a regular user’s computer:
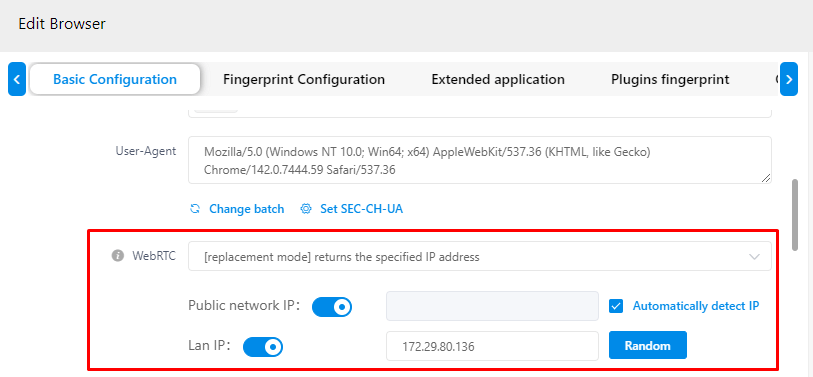
- WebRTC: turn it off so as not to “expose” the real IP.
- Time zone: set it automatically by IP to avoid inconsistencies.
- Geolocation: synchronize with the IP address.
- System language: select the language that corresponds to the IP country/city.
- Application/browser language: the same as the language by IP.
- Screen resolution: use typical presets — this looks more natural.
- Fonts: leave the standard sets to avoid standing out.
- Hardware “noise”: enable all simulation options — this brings the behavior closer to a real device.
- WebGL (metadata): specify common manufacturer/renderer values (for example, “Google Inc.”, “Apple”).
- WebGPU: configure according to WebGL parameters
In the end, with these settings, your profile will look like a separate user – with its unique IP, device, language, and behavior pattern.

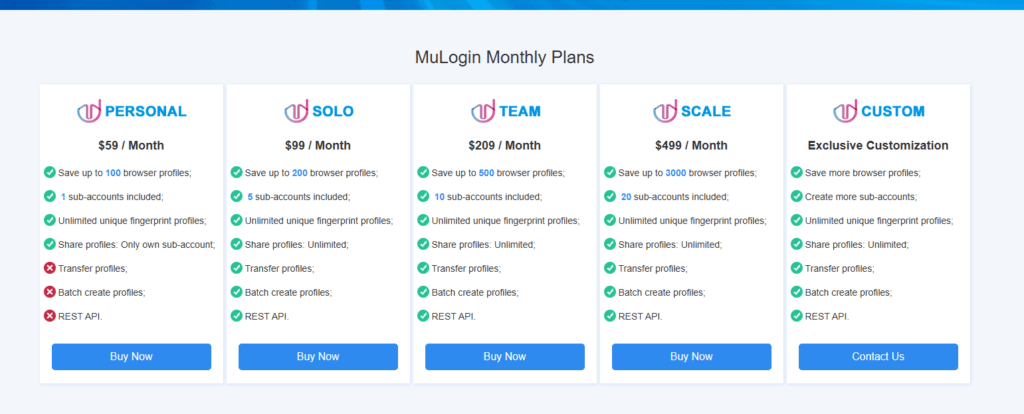
Pricing Plans
You can choose a pricing plan in MuLogin depending on your needs and the number of profiles required:
- Basic plans start at around $59 per month for ~100 profiles and one subaccount.
- More advanced plans offer hundreds and thousands of profiles, more jobs, and extended limits.
Conclusion
MuLogin is a reliable tool for secure and convenient management of multiple accounts. Whether you are an arbitrageur, seller, trader, or someone who needs to maintain multiple online profiles, MuLogin, in conjunction with Prosox proxies, provides the anonymity and control necessary for stable, secure, and efficient work.
MobileProxy Settings
Step 1: Create an Account and Purchase a Proxy
Use promo code MuLogin to get a 20% discount on your first purchase at MobileProxy.Space.
1. Open the MobileProxy.Space website and click "Sign Up" to create your account.
2. After registration, go to your Dashboard. Select the desired country and plan duration (1 day, 7 days, 30 days, 3 months, or 1 year), then complete the purchase. You can also start with a free trial to test the service before buying.
Step 2: Get Your Proxy Connection Details
3. In your Dashboard, locate your active proxy. You will see all the connection credentials you need:
- HTTP Host: mproxy.site
- SOCKS5 Host: bproxy.site
- Port: displayed in your dashboard for each proxy
- Login: your proxy username
- Password: your proxy password
You can also find the IP change link (API URL) which allows you to rotate your IP address instantly at any time.
Step 3: Open MuLogin and Configure the Proxy
4. Open MuLogin and create a new browser profile or select an existing one. Click "Setting proxy server" to open the proxy configuration window (Support a 3-day free trial).
Step 4: Enter the Proxy Settings
5. In the proxy settings window, configure the connection using your MobileProxy.Space credentials.
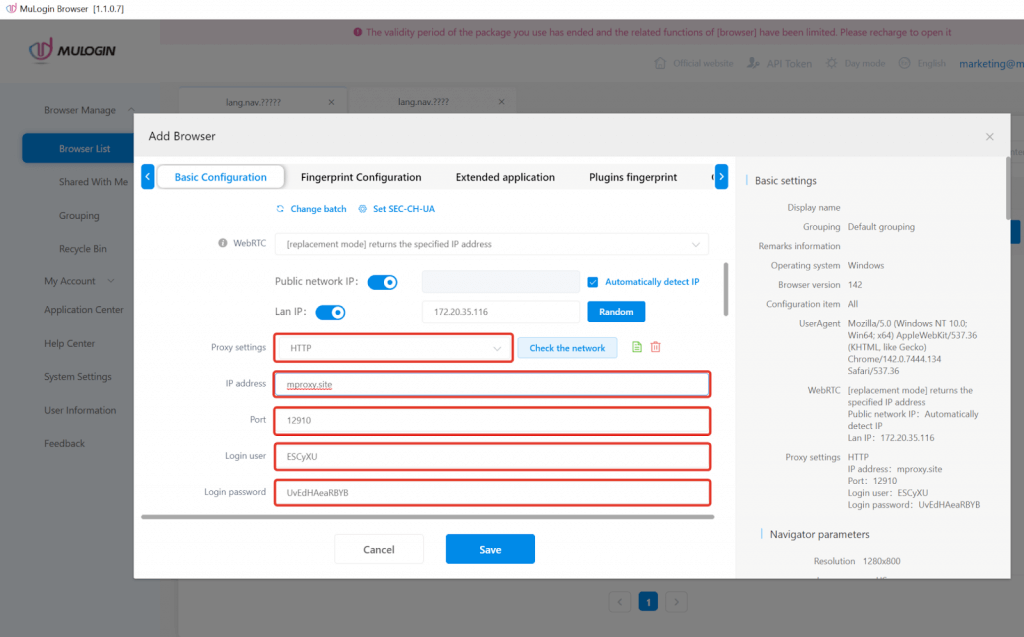
For HTTP Proxy:
- Proxy Type: HTTP
- IP Address: mproxy.site
- Port: your port number from the MobileProxy.Space dashboard
- Username: your proxy login
- Password: your proxy password
The paste format is: mproxy.site:Port:Username:Password
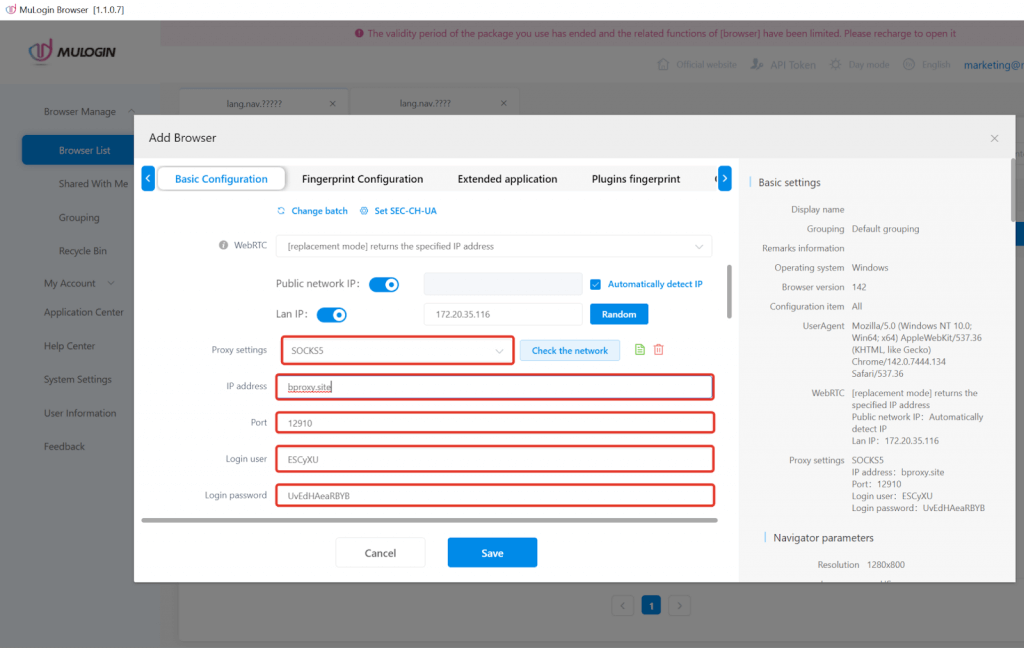
For SOCKS5 Proxy:
- Proxy Type: SOCKS5
- IP Address: bproxy.site
- Port: your port number from the MobileProxy.Space dashboard
- Username: your proxy login
- Password: your proxy password
The paste format is: bproxy.site:Port:Username:Password
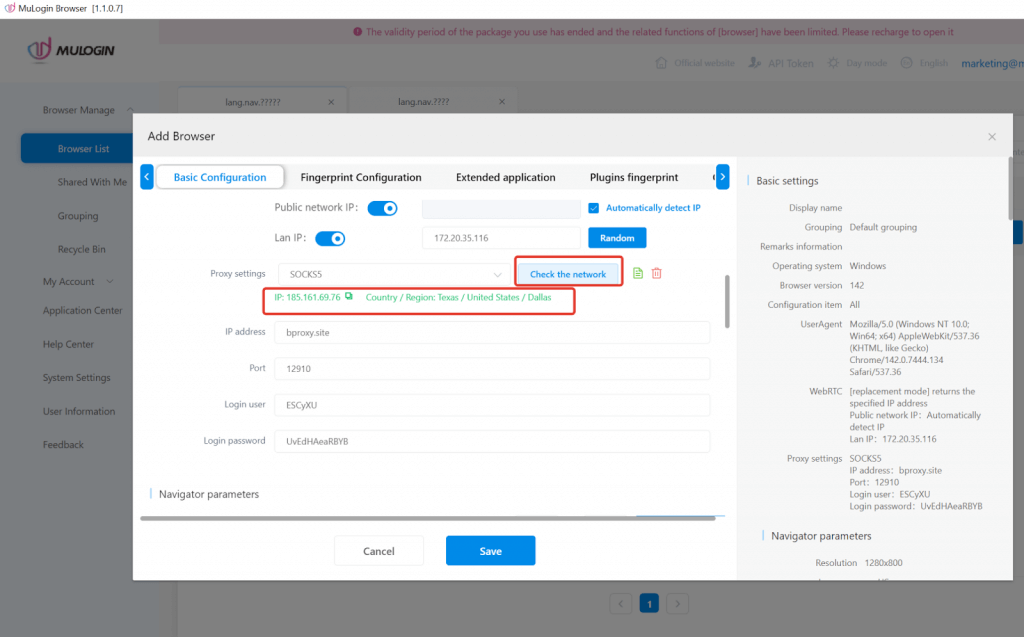
Step 5: Test and Save the Proxy
6. Click "Test Proxy". If the connection is successful, MuLogin will display the proxy IP information including the country and IP address. Click "Save" to apply the settings.
7. You can now open the browser profile and start working through your private mobile proxy.
IP Rotation and Additional Features
Note: MobileProxy.Space provides flexible IP rotation options. You can change your IP address at any time using:
- The IP change button directly in your MobileProxy.Space dashboard
- An API link for automated IP rotation (ideal for scripts and automation tools)
- Timer-based rotation — set automatic IP change intervals in your dashboard settings
MuLogin browser software has no proxy IP service, users need to purchase proxy IP from a third party. Third-party platforms provide proxy-related tutorials and are not related to the MuLogin. Users are strictly prohibited from using MuLogin to engage in any illegal and criminal activities, and users are responsible for the relevant responsibilities caused by using MuLogin.
1024Proxy Settings
1. Log in to the 1024proxy official website. (Free trial includes sub-account features)
2. Select the package type and extract the IP (long-term static, dynamic traffic, unlimited package - bandwidth, unlimited package - port).

3. Download and install the latest MuLogin client.
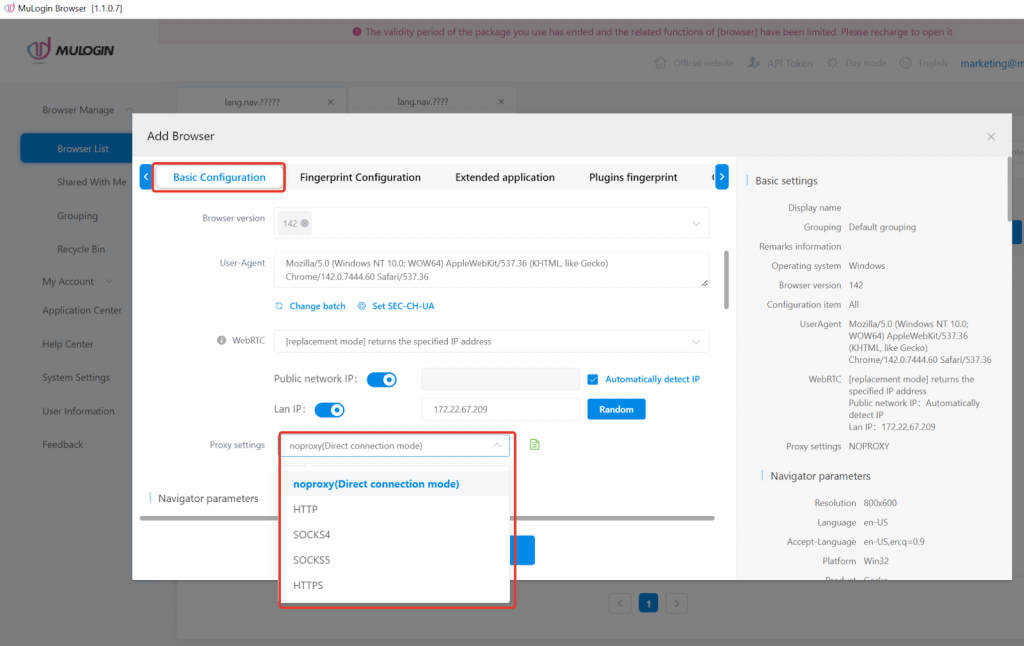
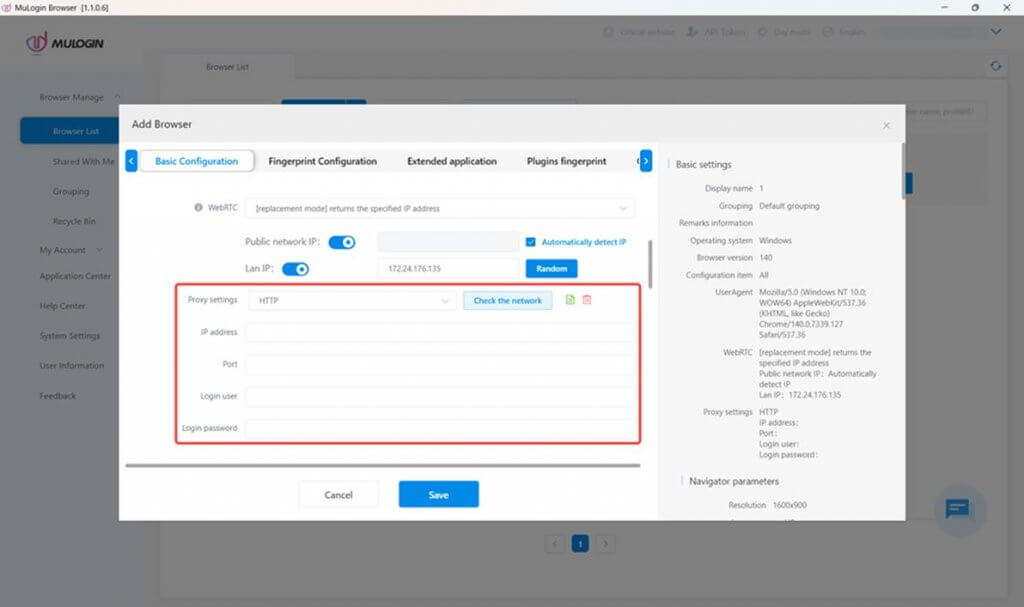
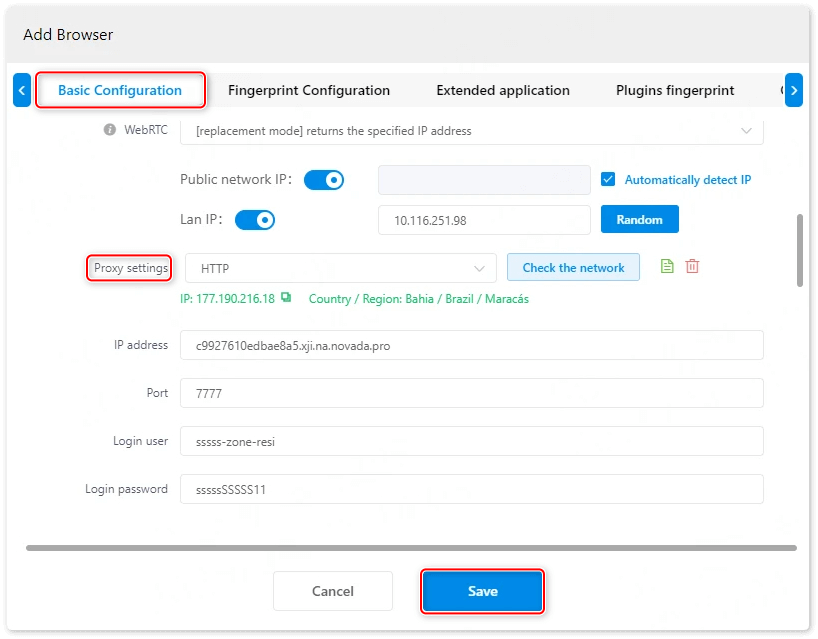
4. New Browser: [Add Browser], a detailed information page as shown in the figure, will appear. Fill in the information in the [Basic Settings] section.
5. Configure proxy: Locate the [Proxy Settings], select "HTTP, HTTPS or Socks5" for the [Proxy Type], then fill in the proxy information of 1024proxy in the corresponding fields, and click [Check the network] to test the connectivity of the proxy. After confirming there are no errors, click [Save] to complete the creation of the browser window.
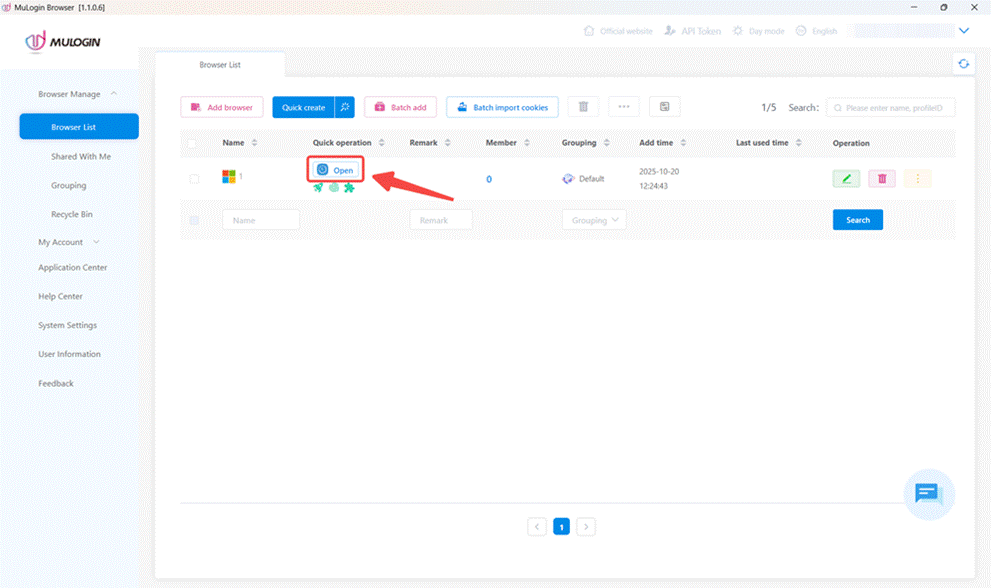
6. After the configuration is completed, select the configured browser and click "Open" to proceed.
Note: MuLogin does not supply proxies; users must purchase them from external providers. All proxy setup instructions come from third-party services, not from MuLogin itself. Using this software for illegal or unlawful purposes is strictly forbidden, and users bear full responsibility for any consequences.
MangoProxy Settings
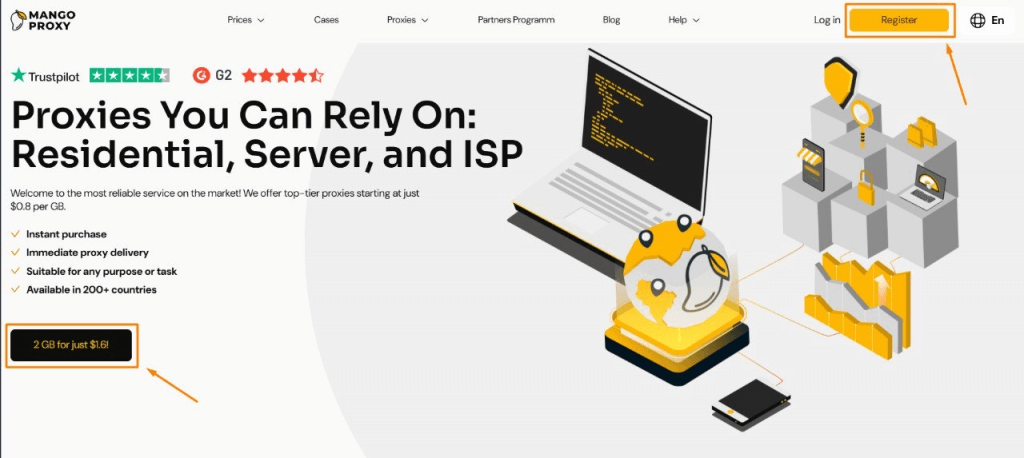
1. Go to the MangoProxy MangoProxy dashboard, then click "Sign up", as shown below.
2. Register and log in to your account.

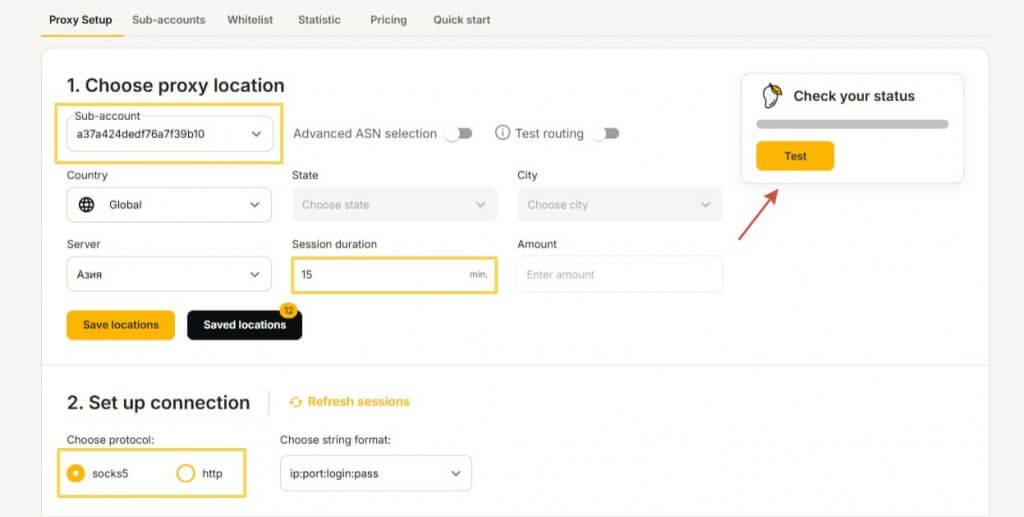
3. Select the proxy information and click "Test" to generate the proxy.
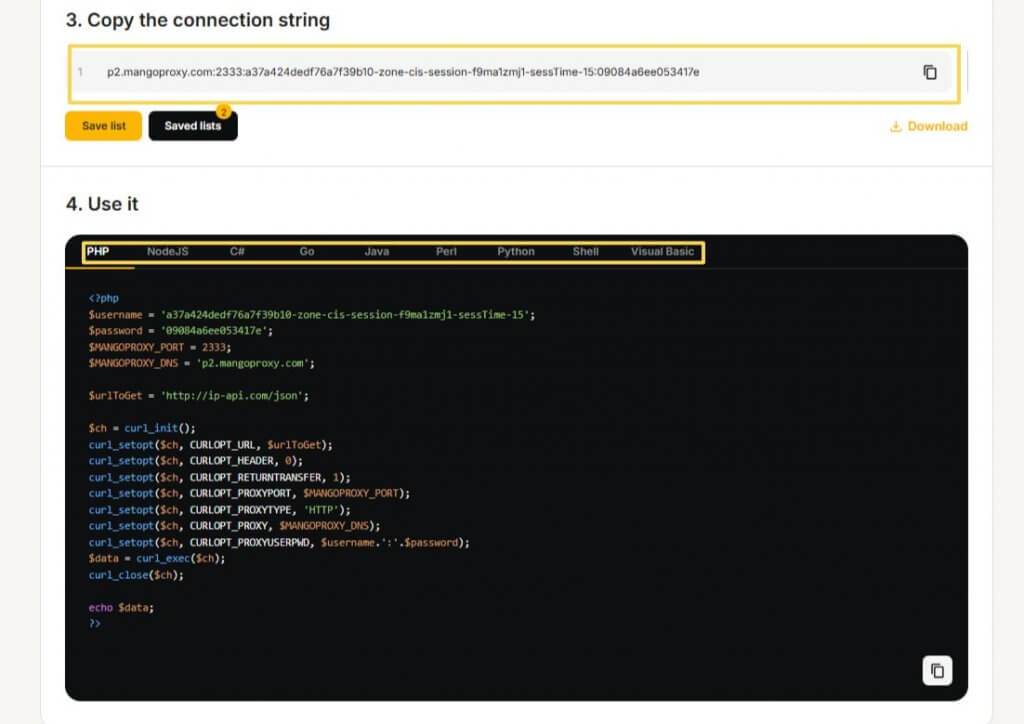
4. Copy your proxy information (ip:port:login:pass).
5. Download and install the latest MuLogin Antidetect Browser.
6. Register an account and then log in to it. (New users can get 3 days free trial)
7. Configure the proxy credentials with MuLogin.
(1) Open MuLogin client. Click “Add browser” to create a new browser profile.
(2) Customize the browser settings to reflect your preferences.
(3) Navigate to “Proxy settings” and customize your IP address. Select proxy type and paste the proxy information. Then, click the “Check the network” to test the connection.
(4) Save the browser profile and open it.
Note: MuLogin does not supply proxies; users must purchase them from external providers. All proxy setup instructions come from third-party services, not from MuLogin itself. Using this software for illegal or unlawful purposes is strictly forbidden, and users bear full responsibility for any consequences.
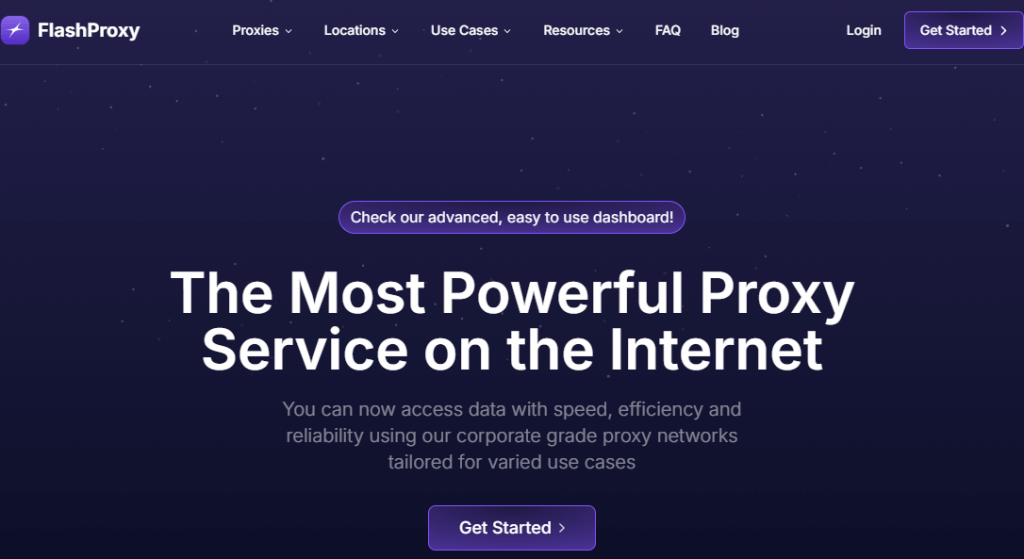
FlashProxy Settings
1. Open official website of FlashProxy.
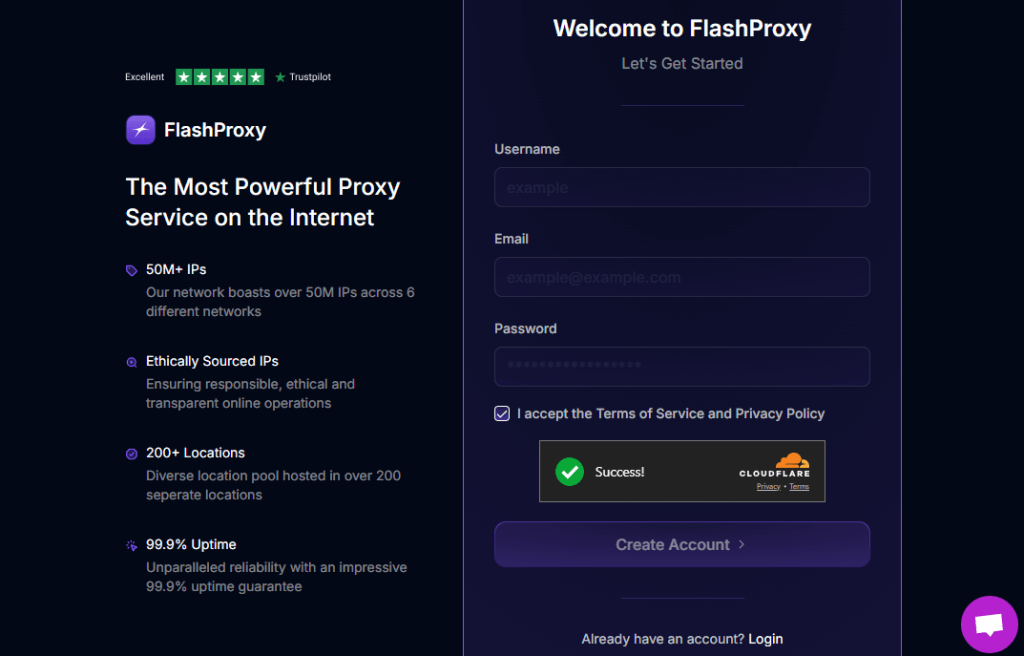
2. Register an account and log in.
3. After purchasing a plan, click "Generate" to create your desired proxy.
Supported Proxy Formats:
- username:password@ip:port
- ip:port:username:password
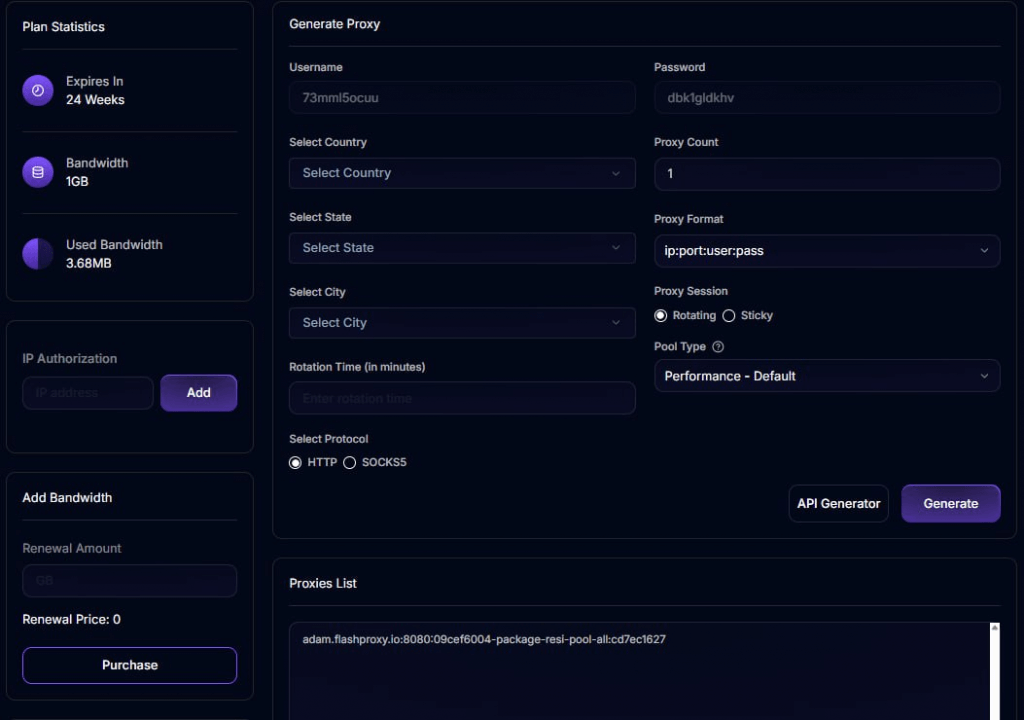
Example:
adamflashproxy.io:8080:09cef6004-package-resi-pool-all:cd7ec1627
4. Download and install the latest MuLogin Antidetect Browser.
5. Register an account and then log in to it. (New users can get 3 days free trial)
6. Configure the proxy credentials with MuLogin.
(1) Open MuLogin client. Click “Add browser” to create a new browser profile.
(2) Customize the browser settings to reflect your preferences.
(3) Navigate to “Proxy settings” and customize your IP address. Select proxy type and paste the proxy information. Then, click the “Check the network” to test the connection.
(4) Save the browser profile and open it.
Note: MuLogin does not supply proxies; users must purchase them from external providers. All proxy setup instructions come from third-party services, not from MuLogin itself. Using this software for illegal or unlawful purposes is strictly forbidden, and users bear full responsibility for any consequences.
NovaProxy Settings
Step 1 – Navigate and set up your NovaProxy account.
1. Create your account at NovaProxy.

2. Deposit money into your account balance.

3. Purchase your desired package.

4. Navigate to your plans page and select the package you purchased.

5. Configure the desired GEO location and sticky/rotation option for your use-case. In this example we're operating with Residential Proxies. In other packages like Static ISP or Static IPV4 the location is chosen prior to the proxy purchase.

6. Generate the proxy and incorporate it in MuLogin Proxy settings.

Step 2 – Add Proxy to MuLogin
1. Download and install the latest MuLogin Antidetect Browser.
2. Register an account and then log in to it. (New users can get 3 days free trial)
3. Configure the proxy credentials with MuLogin.
(1) Open MuLogin client. Click “Add browser” to create a new browser profile.
(2) Customize the browser settings to reflect your preferences.
(3) Navigate to “Proxy settings” and customize your IP address. Select proxy type and paste the proxy information. Then, click the “Check the network” to test the connection.
(4) Save the browser profile and open it.
Note: MuLogin does not supply proxies; users must purchase them from external providers. All proxy setup instructions come from third-party services, not from MuLogin itself. Using this software for illegal or unlawful purposes is strictly forbidden, and users bear full responsibility for any consequences.
IPCook Proxy Settings
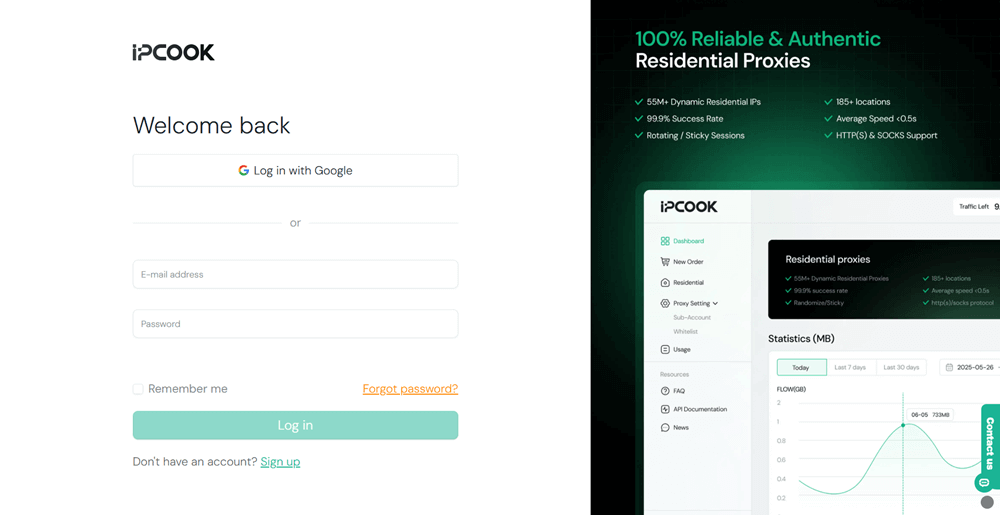
Step 1. Visit IPcook and log in to your account. If you don't have one, click "Sign up" to create one.
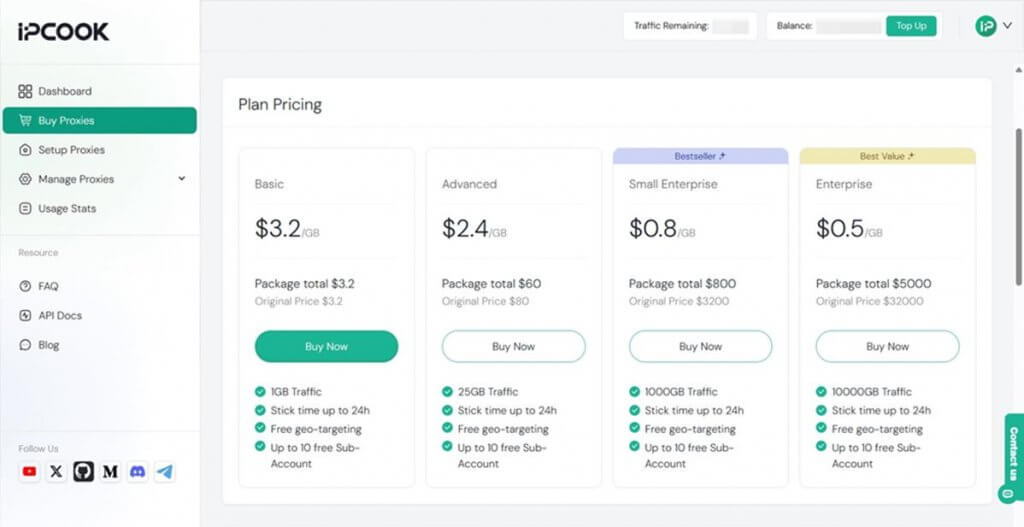
Step 2. After logging in, navigate to the "Buy Proxies" tab on the left sidebar menu. Click "Top Up" to add funds to your account. Then, select a plan that meets your needs in terms of price and data usage. Hit "Buy Now" to finish the payment.
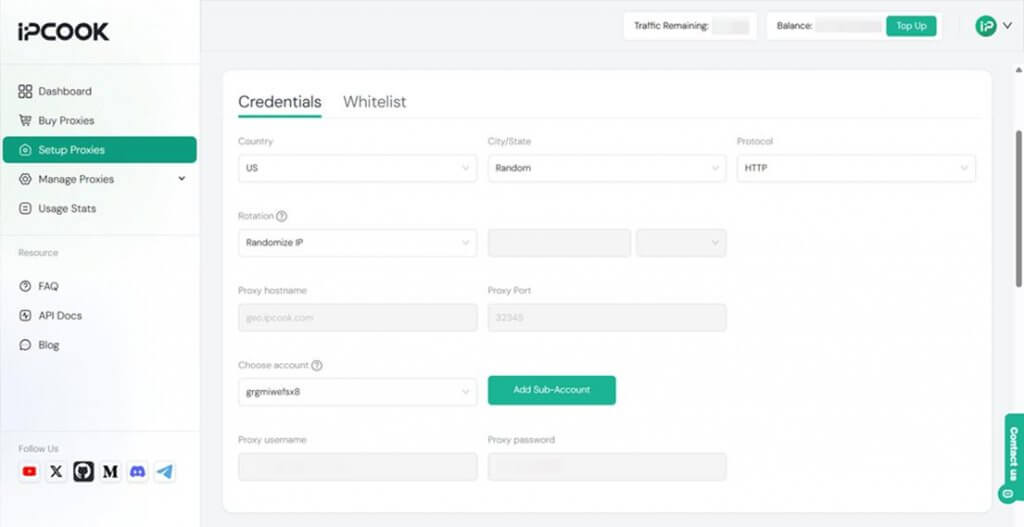
Step 3. Move to the "Setup Proxies" tab. Configure the settings according to your preferences, like country, city/state, protocol, and rotation. Besides, add a sub-account to allocate your data. Then, you will get all the proxy credentials, including hostname, port, username, and password.
Step 4. Go to the MuLogin official website and sign up for an account. Then, download the application and install it on your computer by following the setup instructions. (Support 3-day Free Trial)
Step 5. Launch Mulogin on your computer. Type in your account and password to log in.
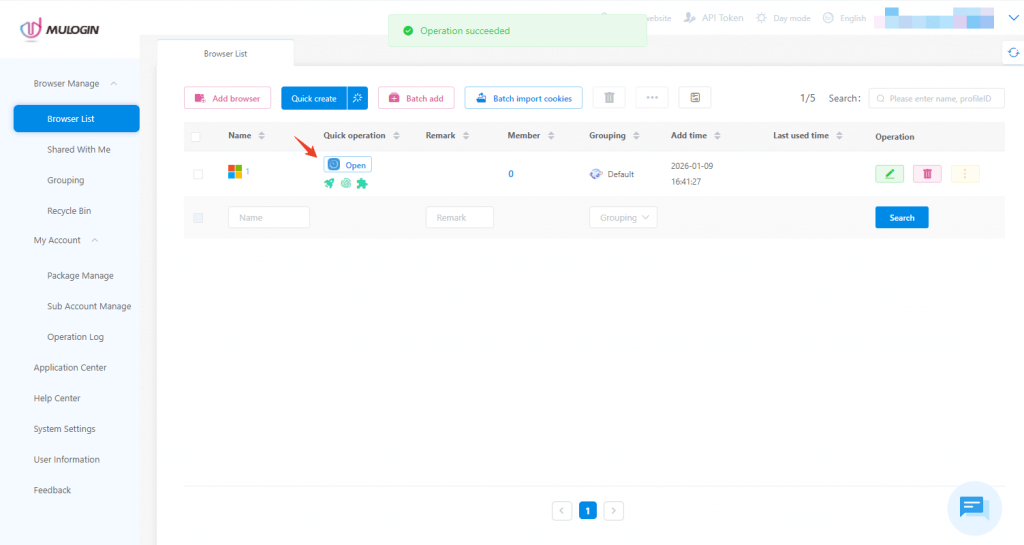
Step 6. On the "Browser List" tab, click "Add browser" to create a new browser profile.

Step 7. In the pop-up window, customize the parameters as you wish, including basic information and browser fingerprints. To set up IPcook proxies, scroll to the proxy section. Click the dropdown menu next to "Proxy settings" to select the proxy protocol you chose on the IPcook dashboard. Then, fill in all the required fields, including IP address, Port, Login user, and Login password. When everything is set, click "Save" to create the profile.
Step 8. The newly created profile will be shown on the "Browser List" tab. Click the "Open" icon to open the browser profile, and you can now browse any website or content online without revealing your own identity.
Note: MuLogin does not supply proxies; users must purchase them from external providers. All proxy setup instructions come from third-party services, not from MuLogin itself. Using this software for illegal or unlawful purposes is strictly forbidden, and users bear full responsibility for any consequences.
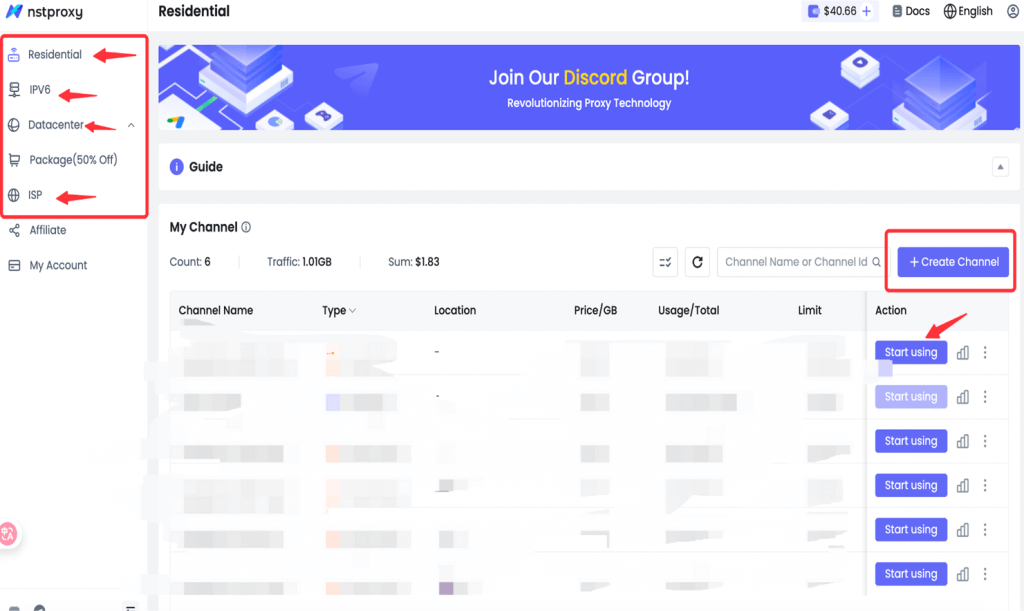
NstProxy Settings
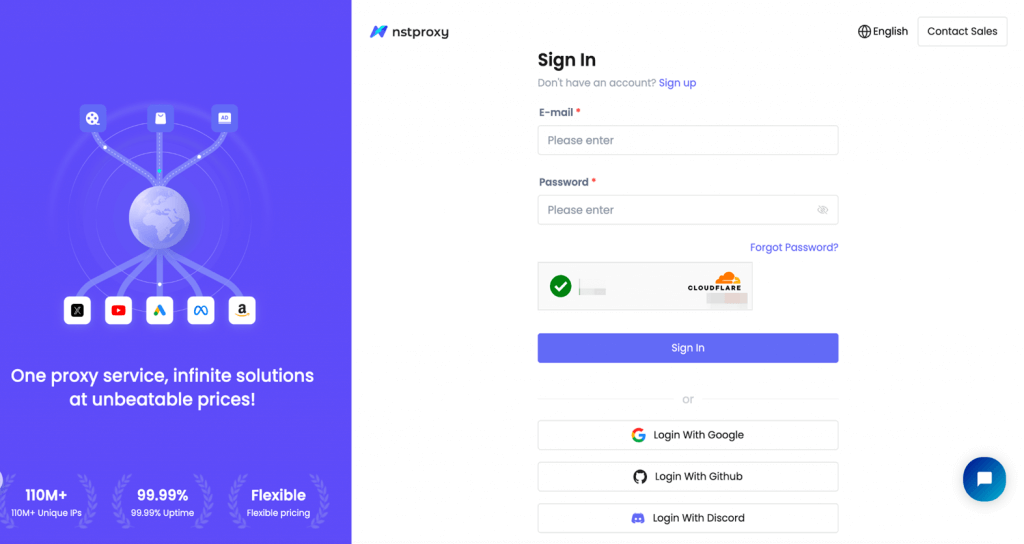
1. Visit NstProxy and sign up or log in.
2. Choose your proxy type (Residential, Datacenter, or ISP) and complete your purchase.
💡 Use bonus code MULOGIN to get 10% off your order!
3. After purchase, go to your Dashboard → My Proxies to find your proxy credentials:
Host:Port:Username:Password
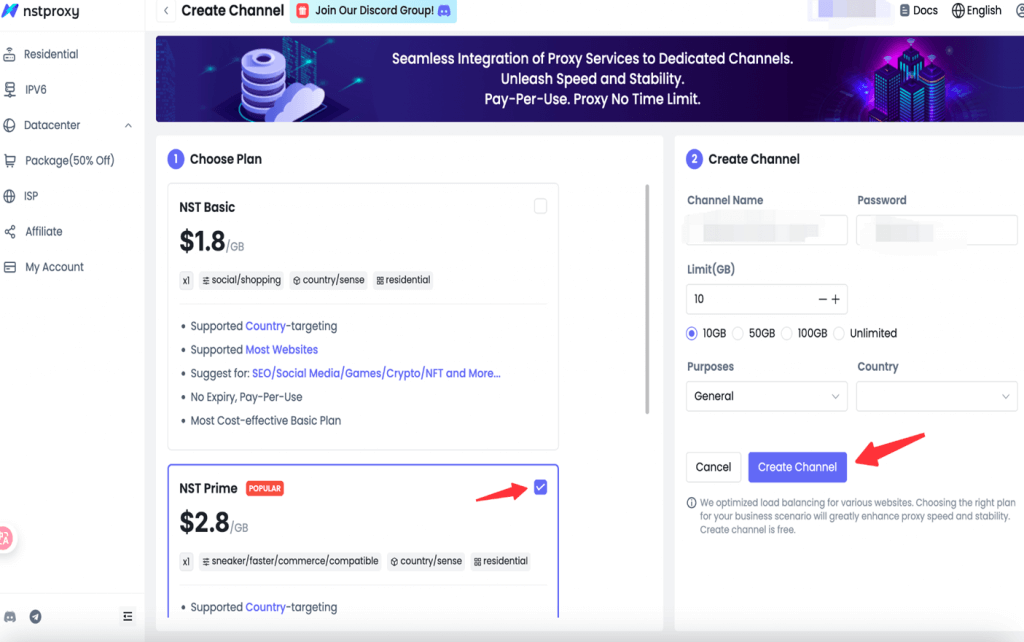
Example:
D3B153E4F8170622-residential-country_US-r_30m-s_abc123:password@gw-us.nstproxy.io:24125
4. Download and install the latest MuLogin Antidetect Browser.
5. Register an account and then log in to it. (New users can get 3 days free trial)
6. Configure the proxy credentials with MuLogin.
(1) Open MuLogin client. Click “Add browser” to create a new browser profile.
(2) Customize the browser settings to reflect your preferences.
(3) Navigate to “Proxy settings” and customize your IP address. Select proxy type and paste the proxy information. Then, click the “Check the network” to test the connection.
(4) Save the browser profile and open it.
Note: MuLogin does not supply proxies; users must purchase them from external providers. All proxy setup instructions come from third-party services, not from MuLogin itself. Using this software for illegal or unlawful purposes is strictly forbidden, and users bear full responsibility for any consequences.
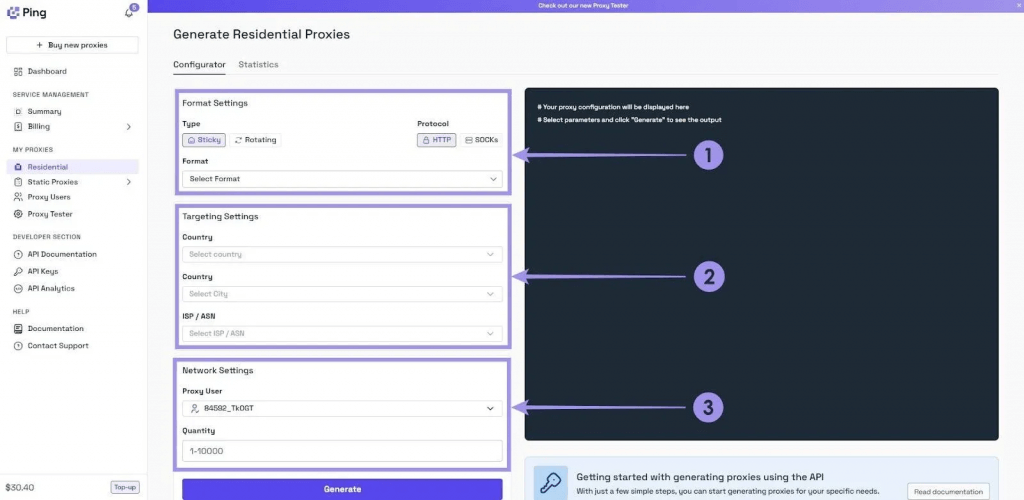
Ping Proxies Settings
Step 1: Set Up Your Ping Proxies
In your Ping Proxies dashboard, head over to the Residential subsection on the sidebar. Fill out the settings in the configurator and press the Generate button.
Copy your generated proxy username, password, and other credentials in the Proxy settings section.
Step 2: Download MuLogin
First, you'll need to go to the MuLogin site, and download the application. (Support 3-day Trial)
Step 3: Create an account
Once the download is finished, launch it and create an account on the Register screen if you don't have already an account or sign in with your existing credentials.
Step 4: Add browser profile
After you register, open the Browser Manage dropdown, click on Browser List, then click Add browser at the top.
Step 5: Enter proxy credentials
You will enter the Basic Configuration interface. After filling in the Display name and other details, scroll down to Proxy settings and set it to HTTP/HTTPS/Socks5.
Step 6: Test and save
Paste the proxy information obtained from Ping Proxies (hostname: port:username:password). Click Check the network—if IP information appears, the proxy IP connection is successful. Finally, click Save.
Note: MuLogin does not supply proxies; users must purchase them from external providers. All proxy setup instructions come from third-party services, not from MuLogin itself. Using this software for illegal or unlawful purposes is strictly forbidden, and users bear full responsibility for any consequences.
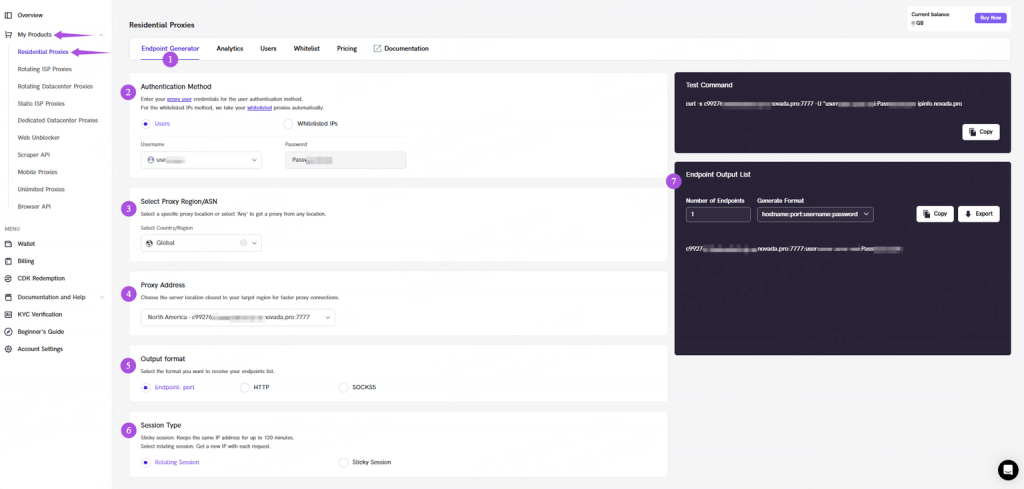
Novada Proxy Settings
Step 1: In the Novada user backend
- Go to Users or Whitelist
- Either: Create proxy users
- Or: Add whitelisted IPs.
Step 2: Access the Endpoint Generator
- Left panel:
✓ Select pre-configured proxy users
✓ Or authenticate via whitelisted IP
✓ Configure parameters (e.g., proxy region)
- Right panel:
✓ Retrieve credentials from Endpoint Output List
✓ Format: hostname:port:username:password
Step 3: Download MuLogin
First, you'll need to go to the MuLogin site, and download the application. (Support 3-day Trial)
Step 4: Create an account
Once the download is finished, launch it and create an account on the Register screen if you don't have already an account or sign in with your existing credentials.
Step 5: Add browser profile
After you register, open the Browser Manage dropdown, click on Browser List, then click Add browser at the top.
Step 6: Enter proxy credentials
You will enter the Basic Configuration interface. After filling in the Display name and other details, scroll down to Proxy settings and set it to HTTP/HTTPS/Socks5.
Step 7: Test and save
Enter the proxy information obtained from Novada (from IP address to Login password, fill in hostname: port:username:password sequentially). Click Check the network—if IP information appears, the proxy IP connection is successful. Finally, click Save.
Note: MuLogin does not supply proxies; users must purchase them from external providers. All proxy setup instructions come from third-party services, not from MuLogin itself. Using this software for illegal or unlawful purposes is strictly forbidden, and users bear full responsibility for any consequences.